qs-jwt: JWT auth for Qlik Sense
JWTs - JSON Web Tokens is a well-established way to authenticate with APIs. The open source tool qs-jwt greatly simplifies the creation of JWTs for both Qlik Cloud and client-managed Qlik Sense.

What is a JWT?
JSON Web Tokens - JWTs - is a basic but well established concept when it comes to authenticate with APIs.
Metadata such as user name, email address and group belongings can be embedded in the JWT, which is then cryptographically signed to ensure the metadata cannot be changed after the JWT's creation.
When signing a JWT it's possible to provide an expiry date after the JWT will no longer be usable.
Qlik has a basic page about using JWTs in client-managed Qlik Sense, with a corresponding page for Qlik Cloud here. Qlik's suggested way of creating JWTs does work but requires more manual steps and isn't as flexible as using qs-jwt.
Pros and cons of JWTs
Benefits of JWTs include
- The Qlik Sense admin can control which Sense user/account is given API access and how long that access will be valid for.
- The JWT can include any metadata that will be available in Sense security rules.
- It's a well established and proven concept to provide authenticated API access.
- It has no external dependencies except the tools needed to create the JWT itself.
Drawbacks of JWTs
- Once created and handed over to someone it's not possible to revoke the JWT. It will simply work until its expiry date has passed or the central certificate is changed. But changing the central certificate will revoke all JWTs created using that certificate/key.
Other technologies such as OAuth client credentials will grant access on a per-request basis, but require a separate authentication server/service/entity. - The revoking issue can be solved, but this requires additional software/services outside of Qlik Sense. Sense itself does not have a built-in revokation service.
- The JWT used with Qlik Sense are not encrypted. This means they can be read by anyone able to listen on the network traffic. Using https goes a long way towards solving this problem.
What is qs-jwt?
qs-jwt is an open source tool that creates JWTs for both client-managed Qlik Sense and Qlik Cloud.
It attempts to streamline the process of creating JWTs, making it easy to create them both manually and as part of automated workflows.
To create JWTs a cryptographic certificate (public certificate + private key) is needed. If you already have a suitable certificate (for example created in Azure or similar) that can be used, otherwise qs-jwt can create certificates for you as part of the JWT creation.
Qlik Sense JWT configuration
Client-managed Qlik Sense
Qlik Sense authentication is configured for each virtual proxy (VP).
To use JWT authentication a new VP therefore has to be created or an existing one modified.
Qlik's doc pages for configuring VPs for JWT authentication are found here and here.
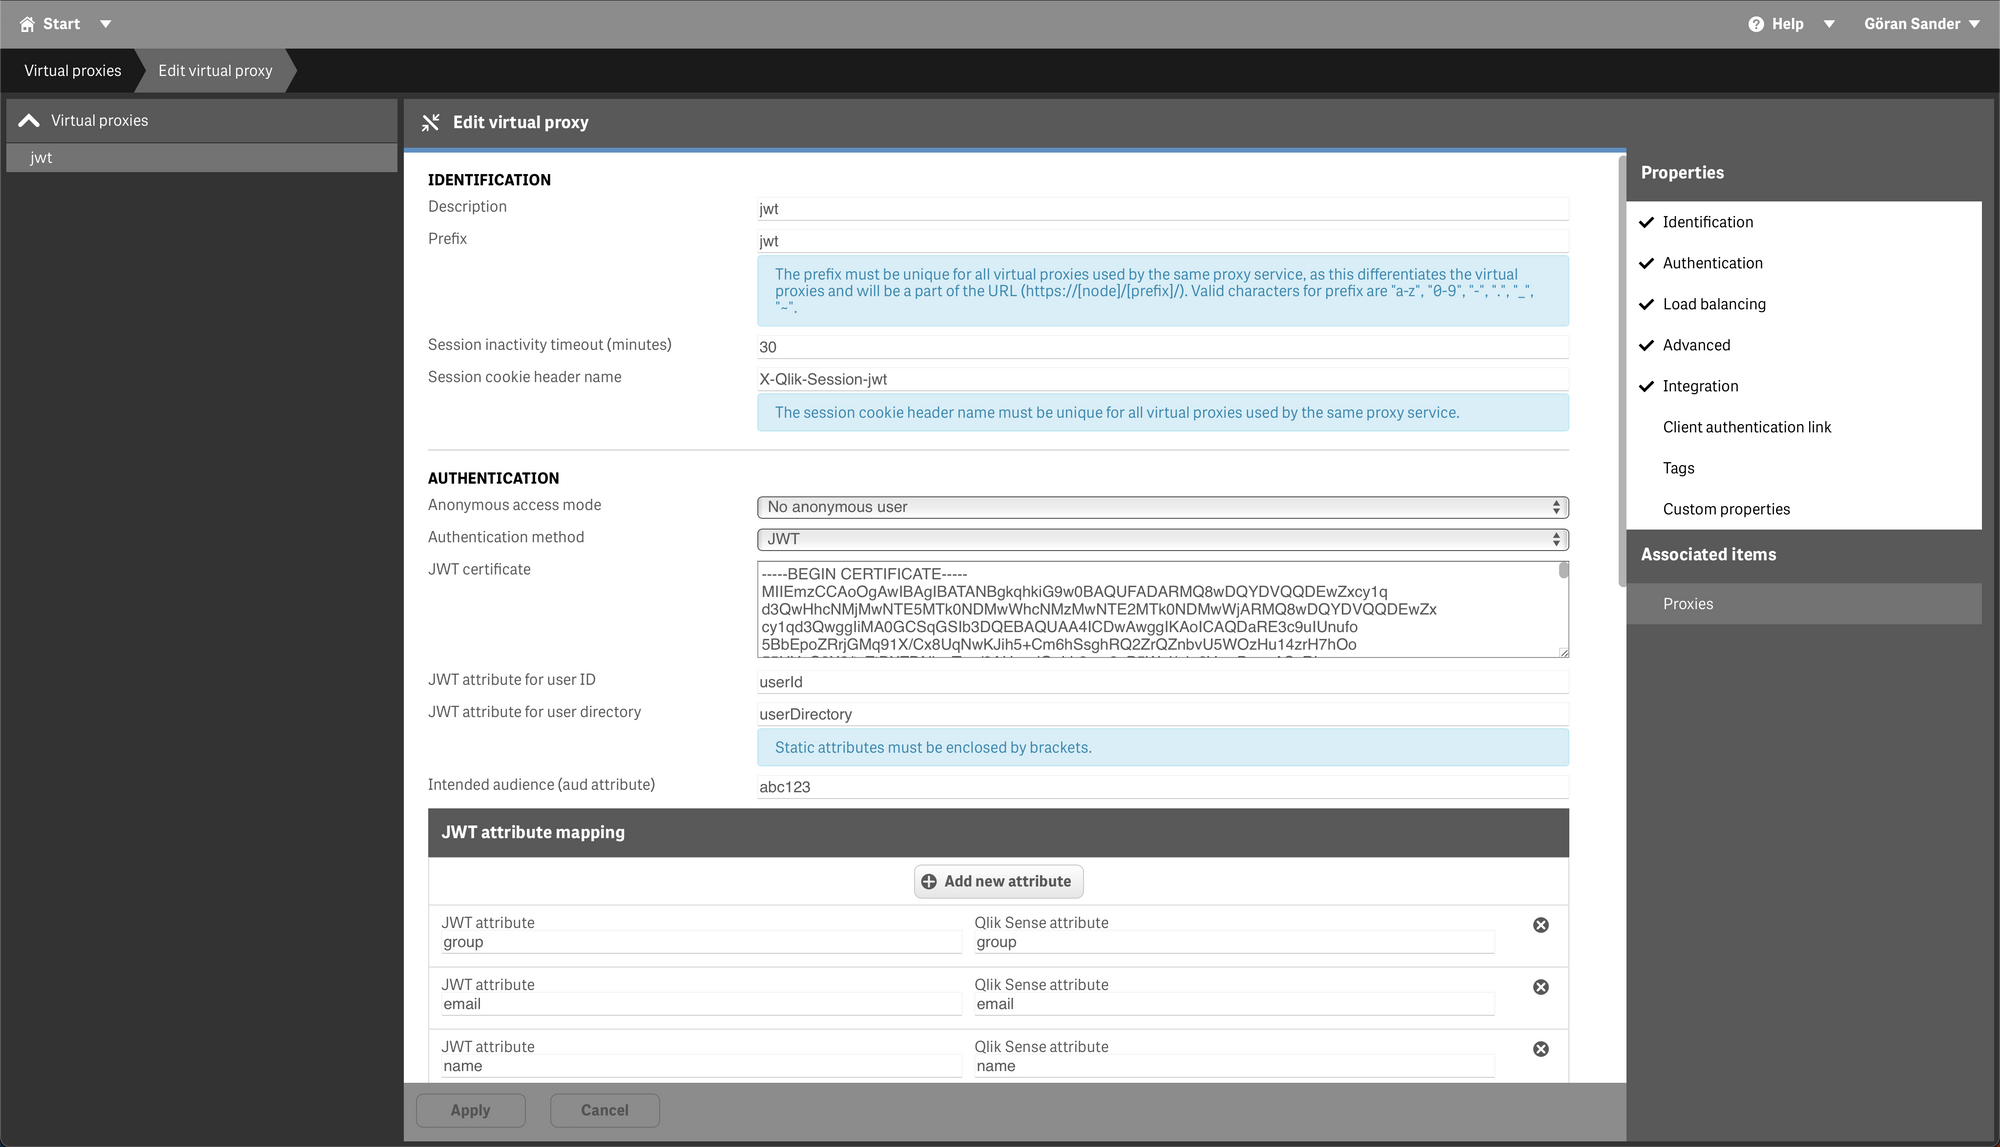
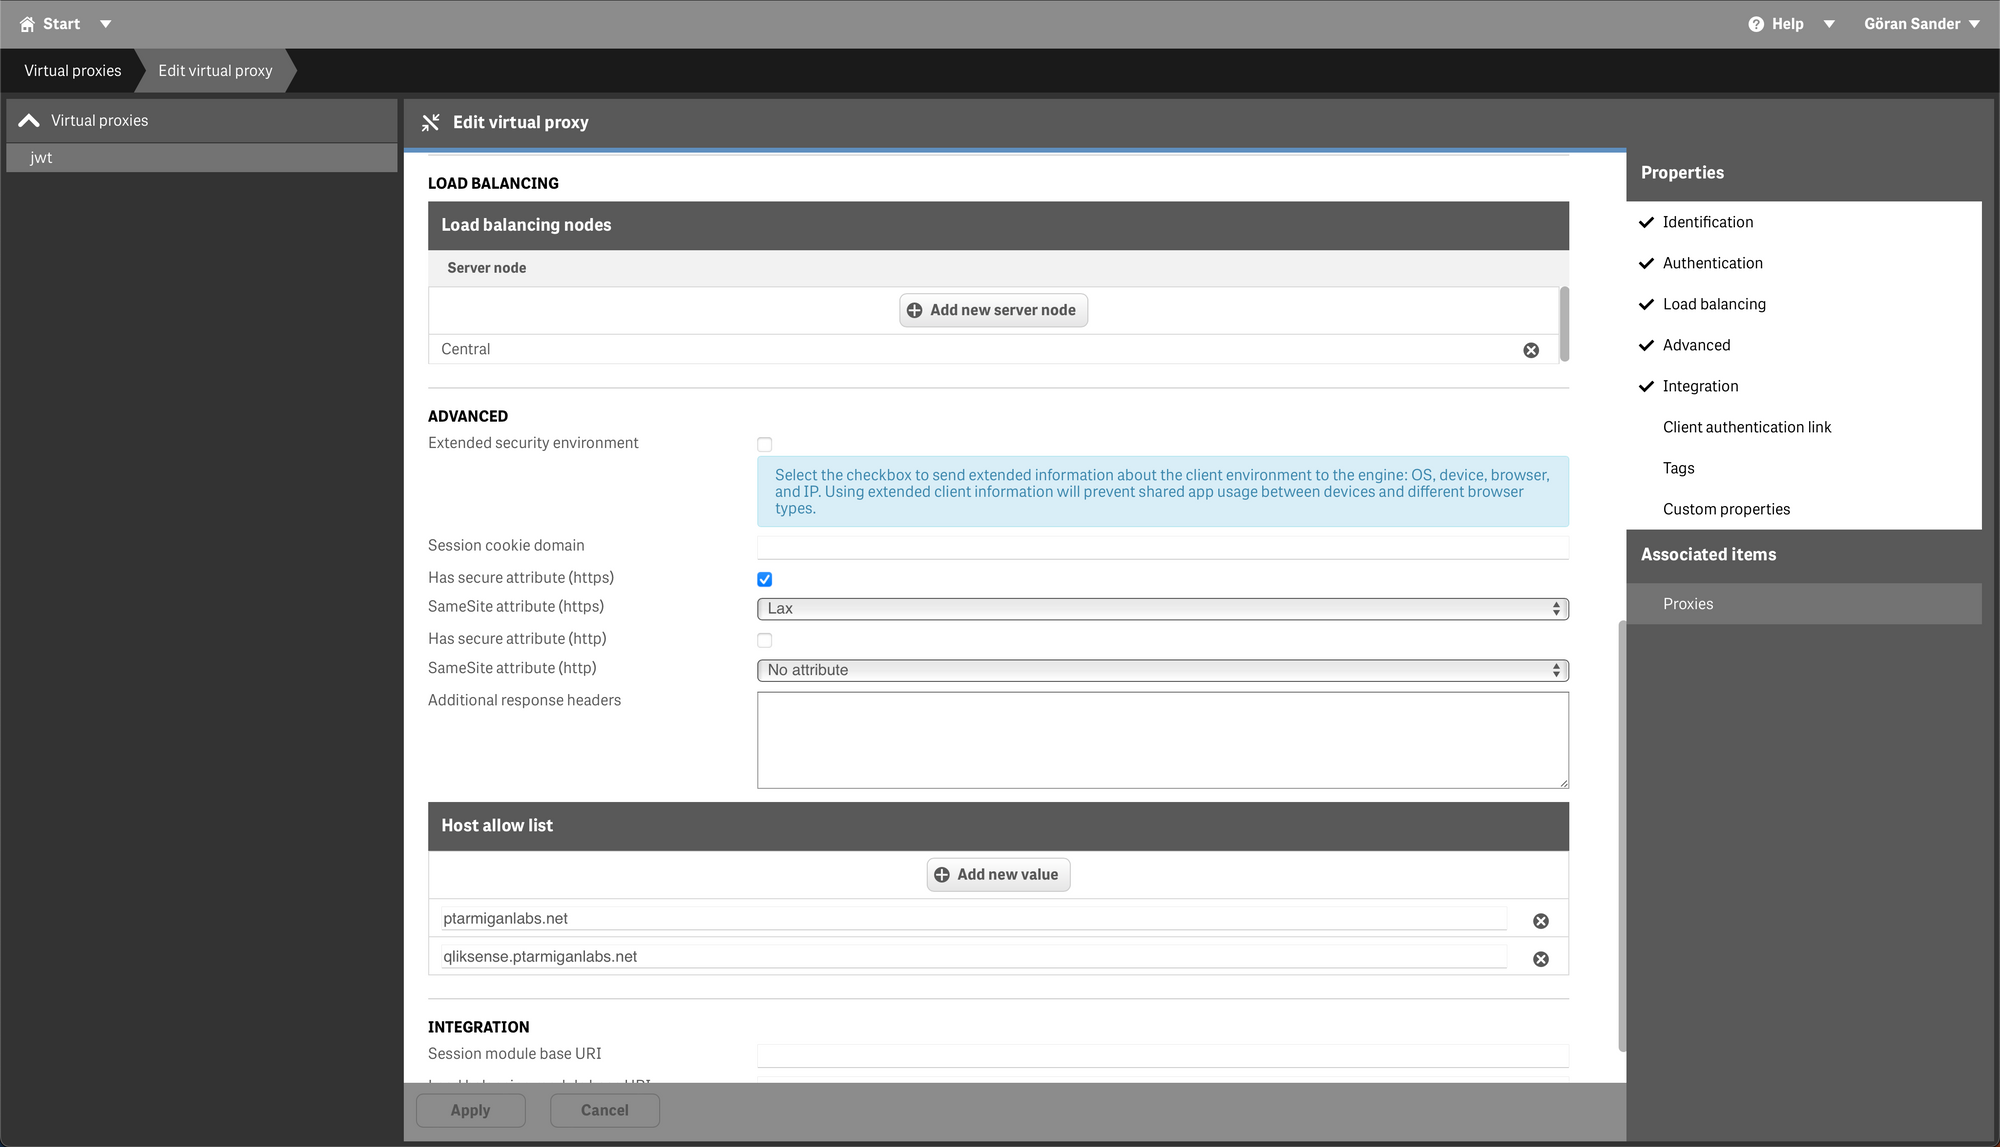
A few comments about the different fields:
- The fields "JWT attribute for user ID/directory" tell Sense what claims in the JWT will be used for user directory and user ID. These fields must be "userId" and "userDirectory" when using qs-jwt to create the JWT.
- "Intended audience" can be anything as long as the string matches the audience parameter passed to qs-jwt when creating the JWT.
- "JWT attribute mapping" should have the values shown in the screen shot above. This will give you access to the group association(s), email address and user name within Sense security rules.
- The rest of the fields are more or less the same as for other virtual proxies, for example "Host allow list" should contain the host name(s) that will be used to access this virtual proxy.
Don't forget to associate the VP with a proxy after the VP has been saved!
The selected proxy will restart and all connected users disconnected.
Qlik Cloud
Qlik Cloud tenants can also be set up for JWT authentication:
- Log in to https://<yourtenant>.<region>.qlikcloud.com/console/home/
- Click "Indentity provider" in the menu on the left. Click "Create new" button on the right.
- Enter configuration settings. "Type=JWT", "Description" can be anything, it's just a textual description of the identify provider.
In this simple example "Issuer" and "Key ID" can be left empty (they will get default values). - Click "Create". A dialog window with Issuer Key ID is shown. These values will be needed when creating a JWT later.
Creating JWTs for Sense API access
Creating certificates in Azure
qs-jwt can create certificates for you, but as creating and storing certificates in a cloud provider is a common scenario we'll look at that too.
Here Azure is used as an example. We will create and download a new certificate that can be used by qs-jwt to sign JWTs. An Azure Key Vault will be used to both create and store the certificate.
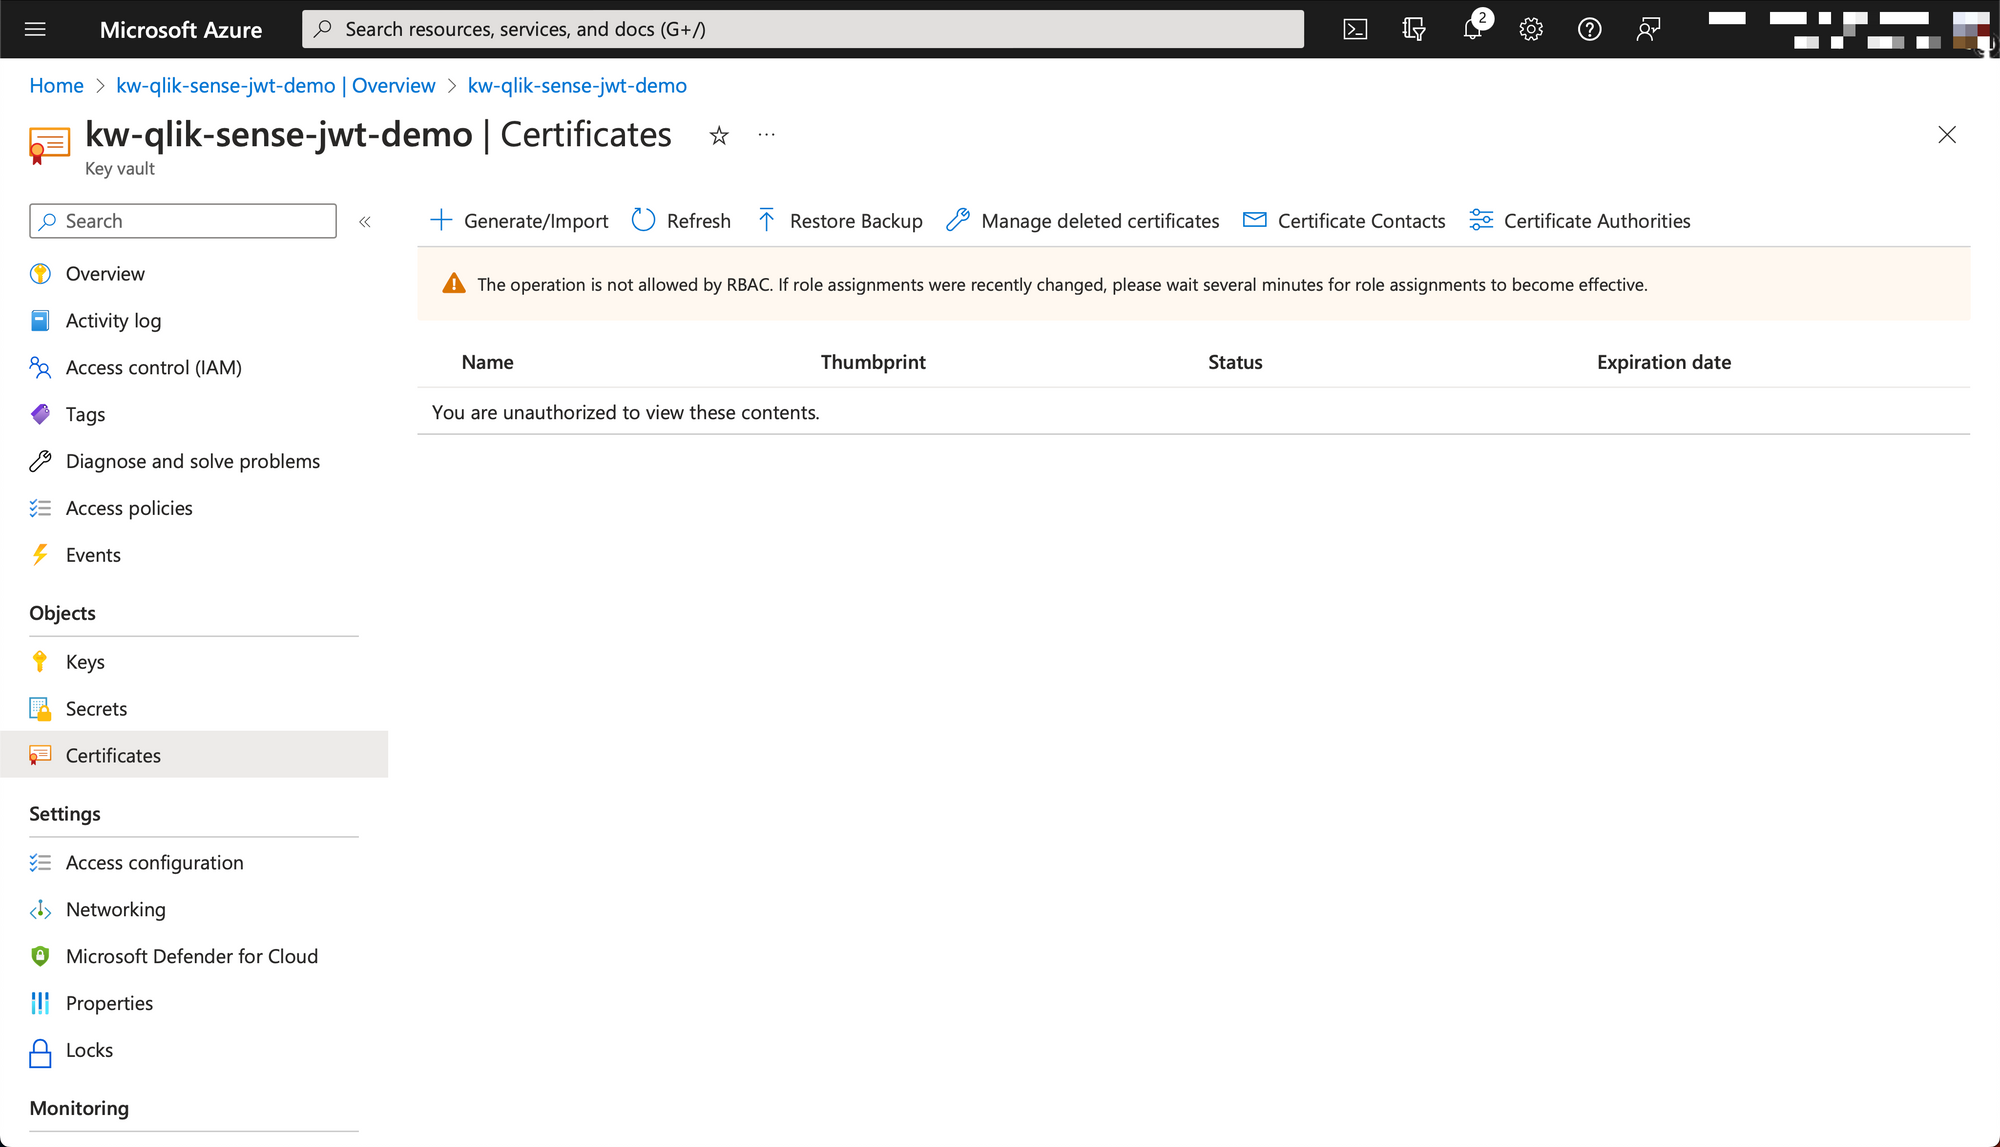
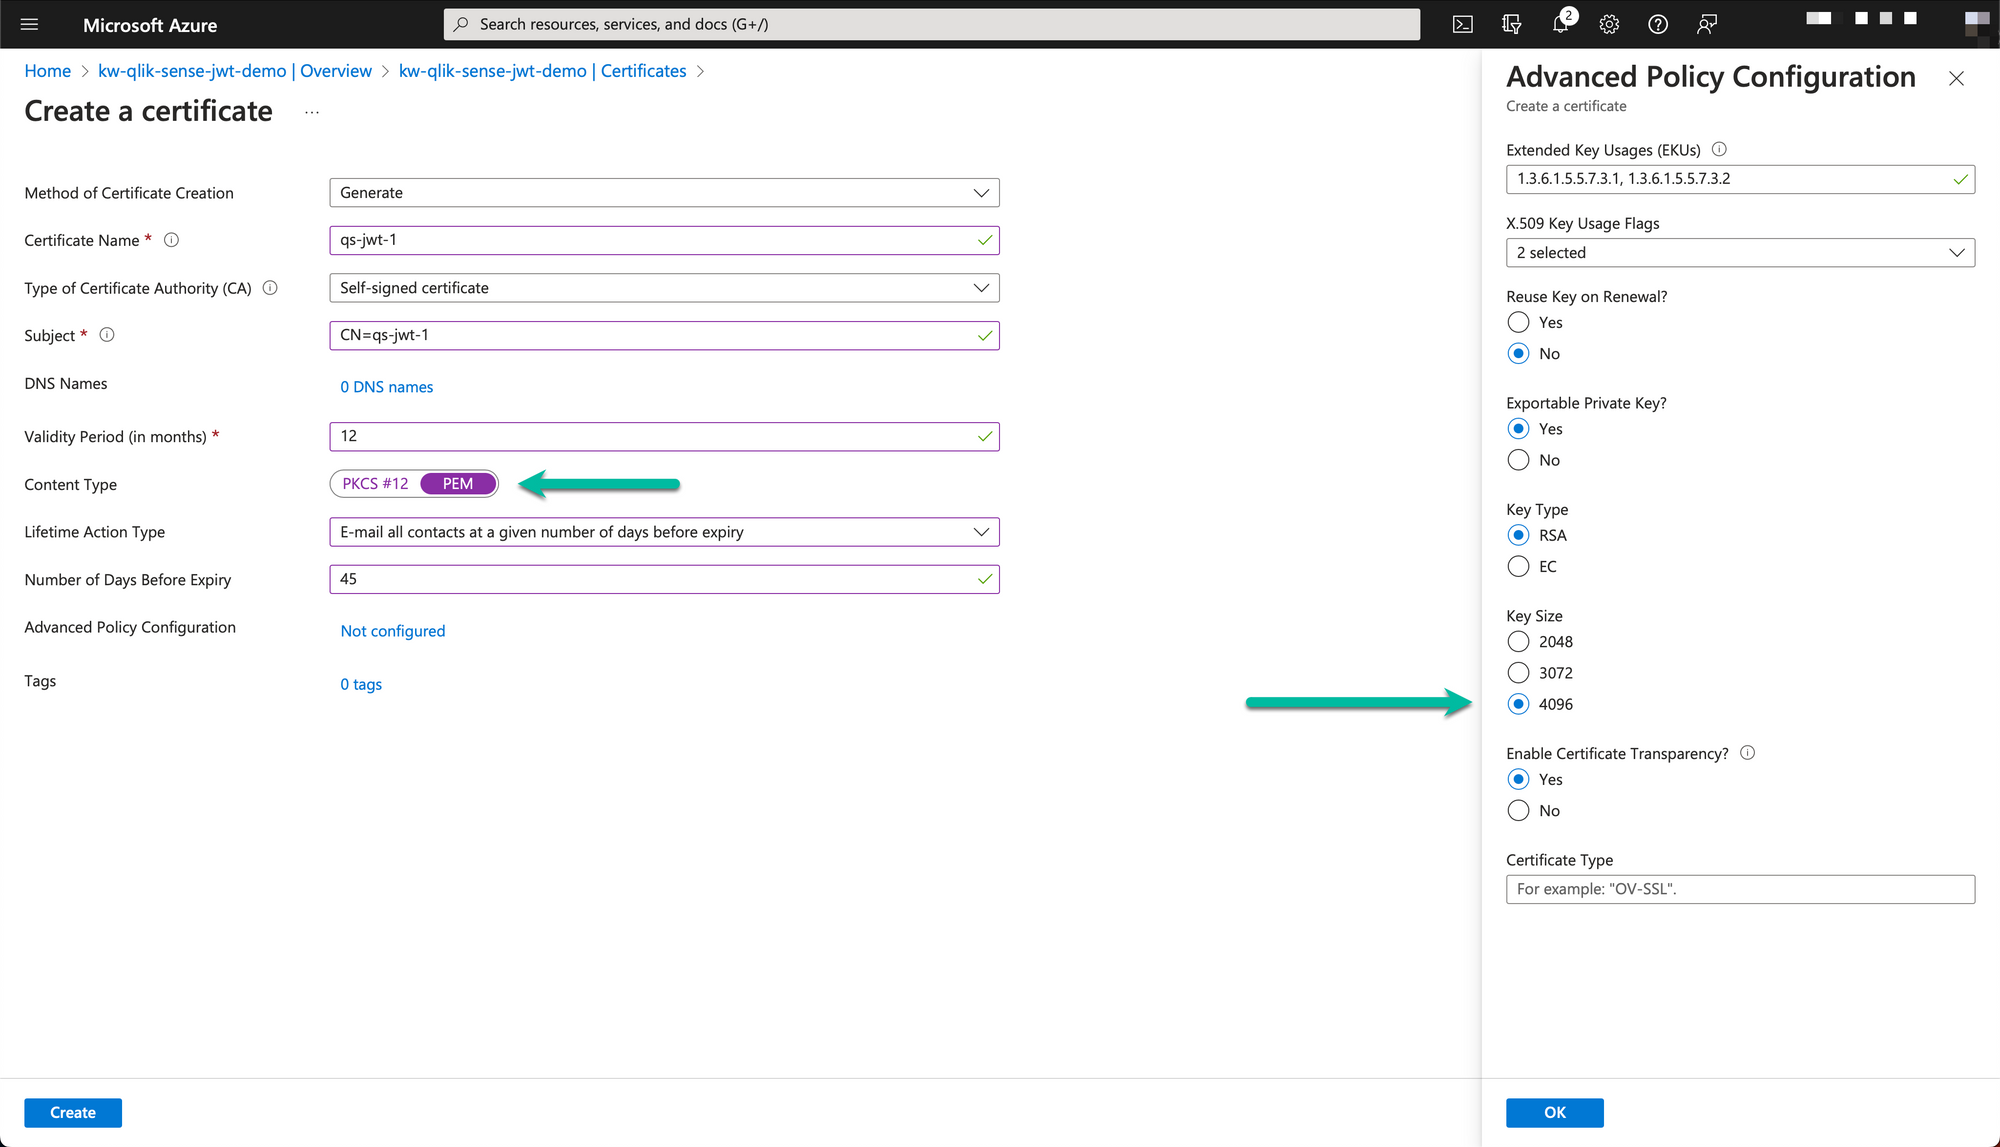
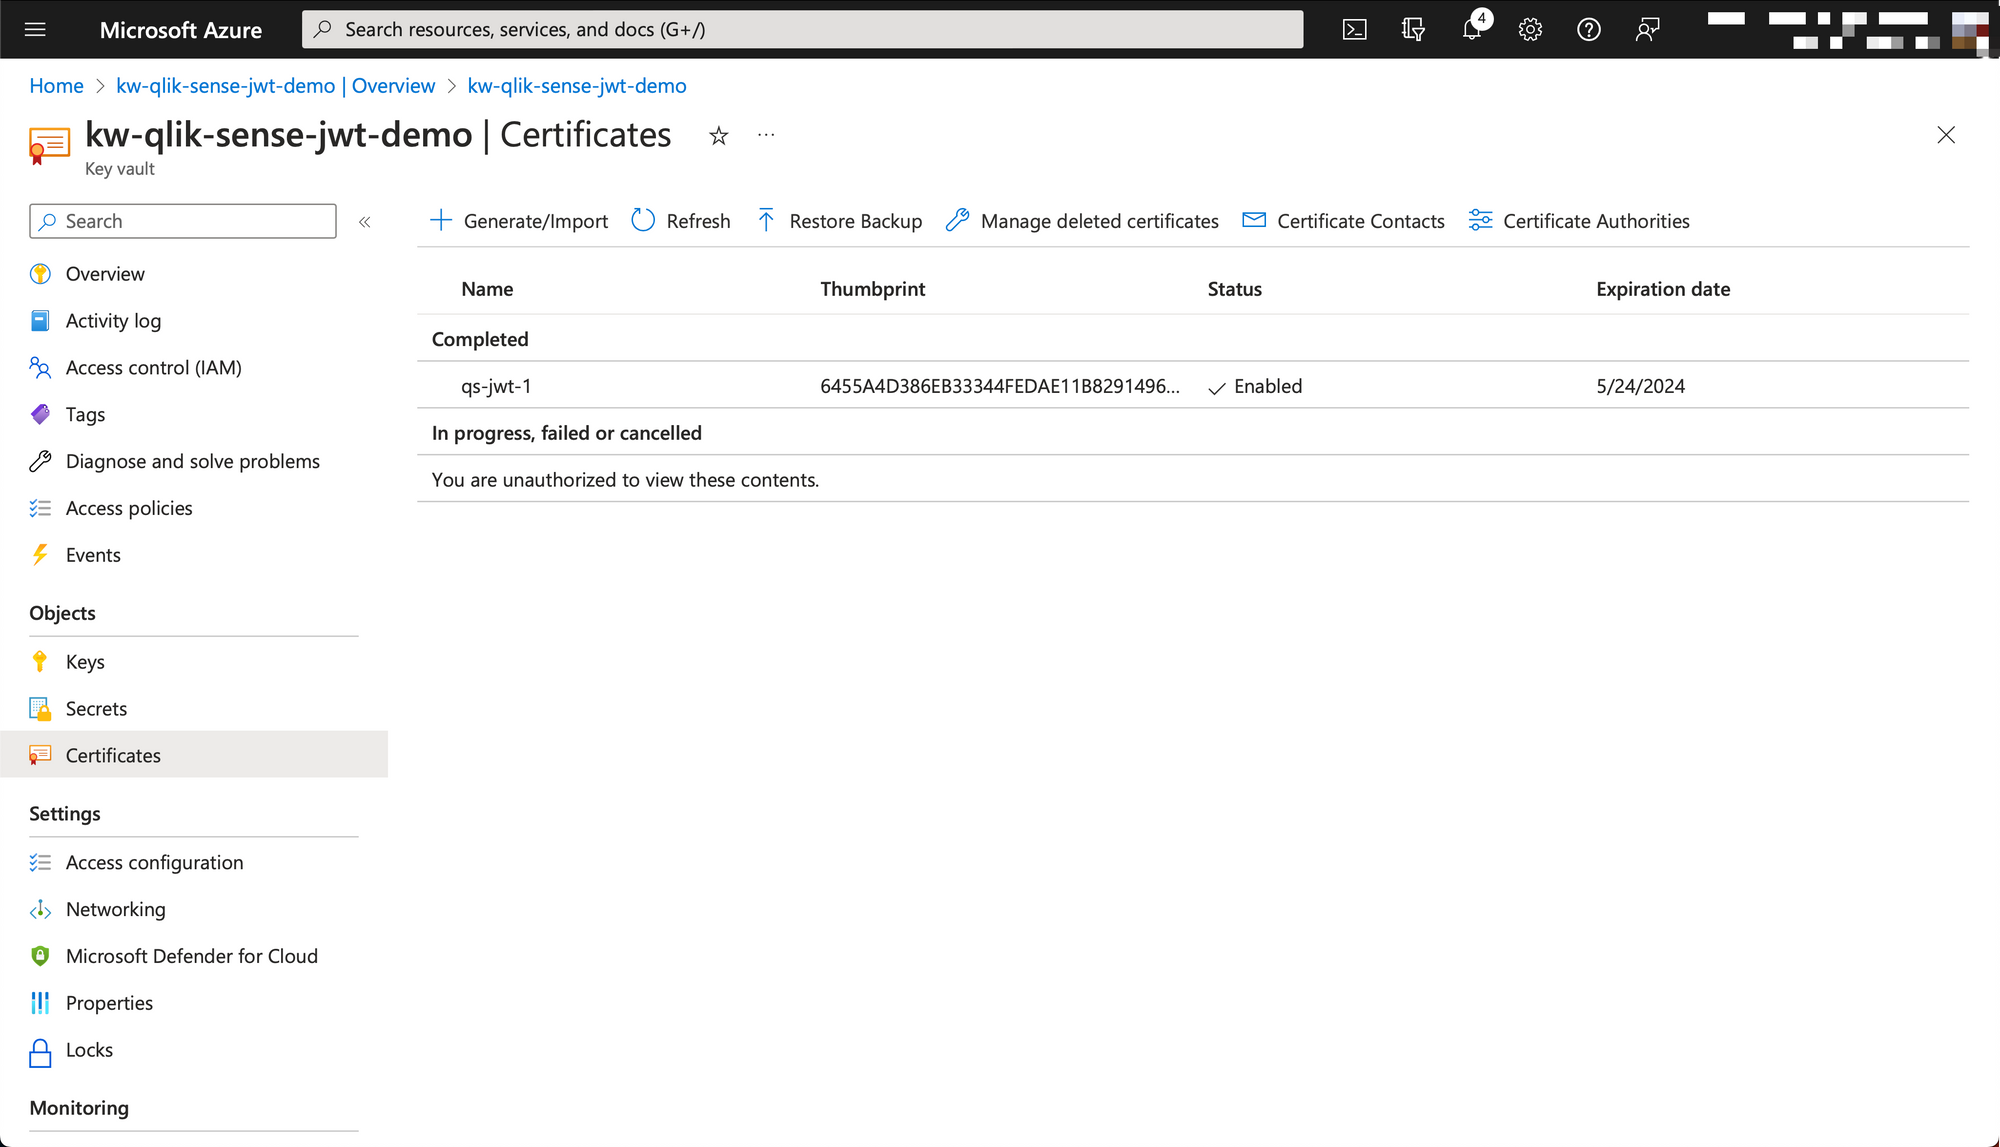
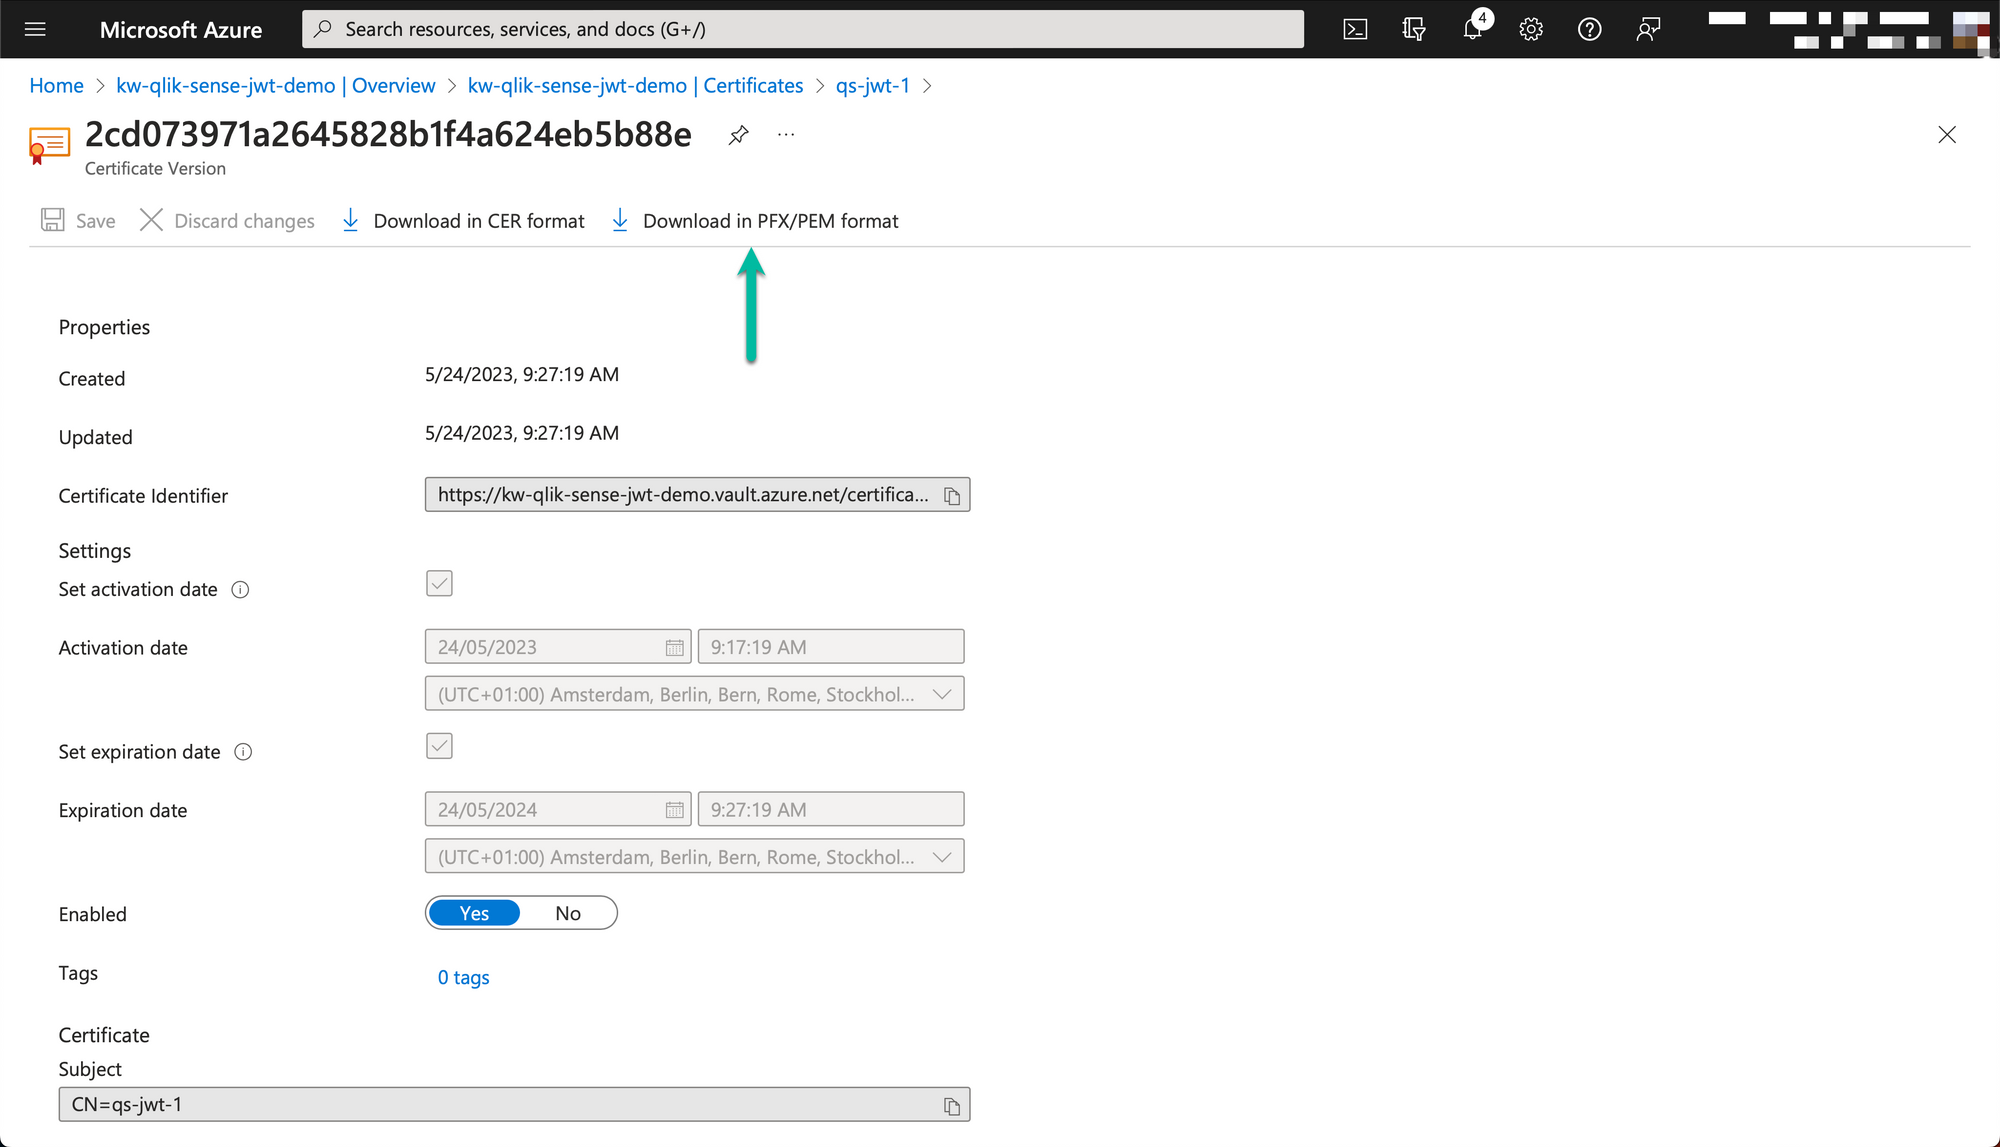
The downloaded PEM formatted certificate will have one section for the private key ("-----BEGIN PRIVATE KEY-----"...) and one for the certificate ("-----BEGIN CERTIFICATE-----"...).
Save the private key part (incl the begin/end private key lines) to a file called for example "jwt-privatekey.pem". Save the certificate part as "jwt-cert.pem".
- The private key should be kept secret as it is used to sign new JWTs.
- The contents of the certificate file is copied into the Qlik Sense virtual proxy settings.
Client-managed Qlik Sense
The open source qs-jwt tool provides an easy - possibly the easiest - way to create JWTs for Qlik Sense.
The qs-jwt page provides examples for creating JWTs on both Windows and macOS/Linux, but we'll repeat some of them here.
For a complete reference please see the qs-jwt page on GitHub.
Let's use the certificate/private key created in Azure in this example. This means
- Use the certificate in "jwt-cert.pem" in the Qlik Sense JWT-enabled virtual proxy.
- Use the private key "jwt-privatekey.pem" when creating the JWT.
.\qs-jwt.exe create-qseow --userdir LAB --userid goran --username "Göran Sander" --useremail "info@ptarmiganlabs.com" --audience hdJh34wkK --cert-privatekey-file jwt-privatekey.pem --groups group1 "group 2" --expires 365d
Please see the qs-jwt doc page for further info on what the parameters mean.
The result contains the created JWT "eyJhbGciO...":
2023-05-22T10:37:03.486Z info: Created JWT:
2023-05-22T10:37:03.486Z info: eyJhbGciOiJSUzI1NiIsInR5cCI6IkpXVC...
Qlik Cloud
The process is very similar to that of client-managed Qlik Sense (above), only a few of the parameters differ.
Load the private key into a PowerShell variable...
$QSJWTPRIVKEY = Get-Content .\jwt-privatekey.pem -Raw
...then create the JWT.
.\qs-jwt.exe create-qscloud --username "Göran Sander" --useremail "goran@ptarmiganlabs.com" --useremail-verified true --issuer "<removed>.eu.qlikcloud.com" --keyid "dcf9f681-e272-<removed>" --expires 1h --cert-privatekey "$QSJWTPRIVKEY" --groups group1 "group 2"
2023-05-24T12:42:15.346Z info: Created JWT:
2023-05-24T12:42:15.346Z info: eyJhbGciOiJSUzI1NiIsIn<rest of JWT>...
Note that the created JWT is only valid for one hour. For security reasons Qlik Cloud puts limits to how long-lived JWTs can be.
Test the created JWTs using Qlik CLI
Client-managed Qlik Sense
Let's use the JWT we created above for client-managed Qlik Sense to list what tags there are in the target Qlik Sense environment. To do this we will use the new JWT with Qlik CLI's QRS command, which makes it easy to interact with Sense's repository service (=QRS).
First let's create a Qlik CLI authentication context:
PS C:\tools\qs-jwt> ..\qlik-cli\qlik.exe context create qsjwt --server https://192.168.100.109/jwt --server-type windows --insecure --api-key eyJhbGciO...(rest of JWT)
PS C:\tools\qs-jwt> ..\qlik-cli\qlik.exe context use qsjwt
Context: qsjwt
Finally let's get a JSON-formatted list of available tags
..\qlik-cli\qlik.exe qrs tag ls
[
  {
    "id": "49b301b4-824f-4c21-8585-8bb38e062297",
    "name": "Supported Extension",
    "privileges": null
  },
  {
    "id": "8c344ba1-d936-4c16-b02c-b29e37fbe62e",
    "name": "Test data",
    "privileges": null
  },
  {
    "id": "2f6c792d-7a9d-4a3f-8148-a5f0c3b864d4",
    "name": "apiCreated",
    "privileges": null
  },
  {
    "id": "e9a14807-bc82-4047-a9f7-f09a7b73383e",
    "name": "Butler 5.1 demo",
    "privileges": null
  }
]
Once done you may want to remove the Qlik CLI context:
..\qlik-cli\qlik.exe context rm qsjwt
Qlik Cloud
Here we'll use a more low-level way of calling Qlik Cloud APIs compared to using Qlik CLI.
First we'll set up some variables and authenticate with the API and put the session cookies in a variable called "WebSession".
$hdrs=@{}
$hdrs.Add("Authorization", "Bearer eyJhbGciOiJSUzI1NiI<rest of JWT>...")
$url1="https://<removed>.eu.qlikcloud.com/login/jwt-session"
$url2="https://<removed>.eu.qlikcloud.com/api/v1/spaces"
Invoke-RestMethod -Uri $url1 -Method Post -Headers $hdrs -SessionVariable WebSession
If we get an OK back from the authentication call we can now get info from the Qlik Cloud API, for example list what spaces there are:
Invoke-RestMethod -Uri $url2 -Method Get -WebSession $WebSession
data
----
{@{id=6339290e3...; type=managed; ownerId=6337ecdce2...; tenantId=cr0KDXLpXb...; name=Demo apps; description=Butler and SenseOps demo apps; meta=;...
