
Superpowers to Qlik Sense Enterprise: The Traefik reverse proxy, part 1


Edit: A GitHub repository has been created with the files mentioned in this article: https://github.com/mountaindude/qlik-sense-and-traefik
What’s Traefik and how does it relate to Qlik Sense?
Traefik is one of today’s most hyped reverse proxies. It’s available in both a commercial and a (very capable!) open source version. According to the company behind Traefik it’s been downloaded more than 2 billion times – that’s a lot…
In this blog post we’ll take a look at how Traefik can run natively on Windows server, providing services to a Qlik Sense Enterprise on Windows cluster.
We will see how this can make Qlik Sense easier to use for end users as well as easier to run and operate for sysadmins.
Specifically, we’ll use Traefik to set up TLS secured access (a.k.a. https) to Qlik Sense, while at the same time establishing a solid platform to which we can add more features in coming blog posts.
Starting with the basics makes sense though – let’s get to it!
One of the reasons for Traefik’s popularity is that it’s a very common choice when setting up Kubernetes clusters – it’s even bundled with Rancher’s excellent (open source) k3s distribution. But it’s also a very powerful tool when just running a few Dockerised applications that need human friendly URLs associated with them.
k3s is worthy of a blog post of its own, let’s just say that it takes the pain out of setting up Kubernetes clusters – a new cluster takes just a couple of minutes to launch. Extremely cool.
So why is Qlik Sense and Trafik such a great match?
Well, Qlik Sense is a great BI platform, but doesn’t really offer much in terms of networking extravaganza. Traefik on the other hand very nicely fills that extravaganza niche, offering all kinds of network goodness to Qlik Sense.
What’s a reverse proxy?
Good question. The Wikipedia definition of a reverse proxy is:
A reverse proxy takes requests from the Internet and forward them to servers in an internal network. Those making requests to the proxy may not be aware of the internal network.
In reality reverse proxies are used more widely than this, the “…from the Internet…” is for example not always the case, reverse proxies are often used also in pure intranet scenarios. The general idea is however nicely expressed in the Wikipedia article: Reverse proxies hide to the users of a web tool/service how that tool actually works, what servers it runs on etc.
Let’s look at a few scenarios how Traefik can be used with Qlik Sense.
Qlik Sense and Traefik examples
Qlik Sense and Traefik – basic scenario
One of the most basic use cases for a reverse proxy looks like this:
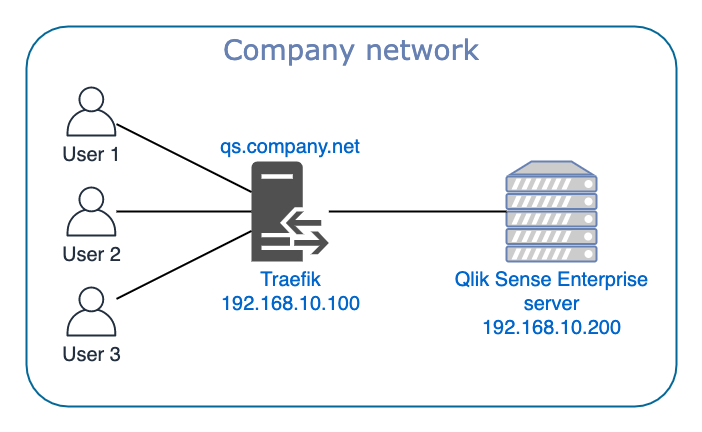
Users access Qlik Sense Enterprise (=QSE) via the URL https://qs.company.net, with the DNS configured so that qs.company.net points to 192.168.10.100, which is the server where Traefik is running. Traefik forwards the requests from the users to the QSE server. When the QSE server sends responses to the user, these are first sent to Traefik that forwards them to the user.
Great – that’s easy enough to understand, but we could have achieved the same thing without Traefik. Just point qs.company.net straight to the QSE server, i.e. to 192.168.10.200. In this basic scenario Traefik doesn’t add much, except maybe performance monitoring and metrics (see below).
Qlik Sense and Traefik – multiple virtual proxies
Now a slightly more complex example that cannot be solved by DNS configuration alone. The scenario is:
- The finance department in our fictitious company must for legal reasons have their own Sense server. That server should still be part of the company’s QSE cluster.
- A separate virtual proxy “finance” is used to provide access for the finance department to Sense. It is linked to the proxy on the finance QSE server.
- https://qs.company.net/finance should take users to the finance specific server
- https://qs.company.net is for everyone else, and should go to the default “/” virtual proxy on the main Sense server
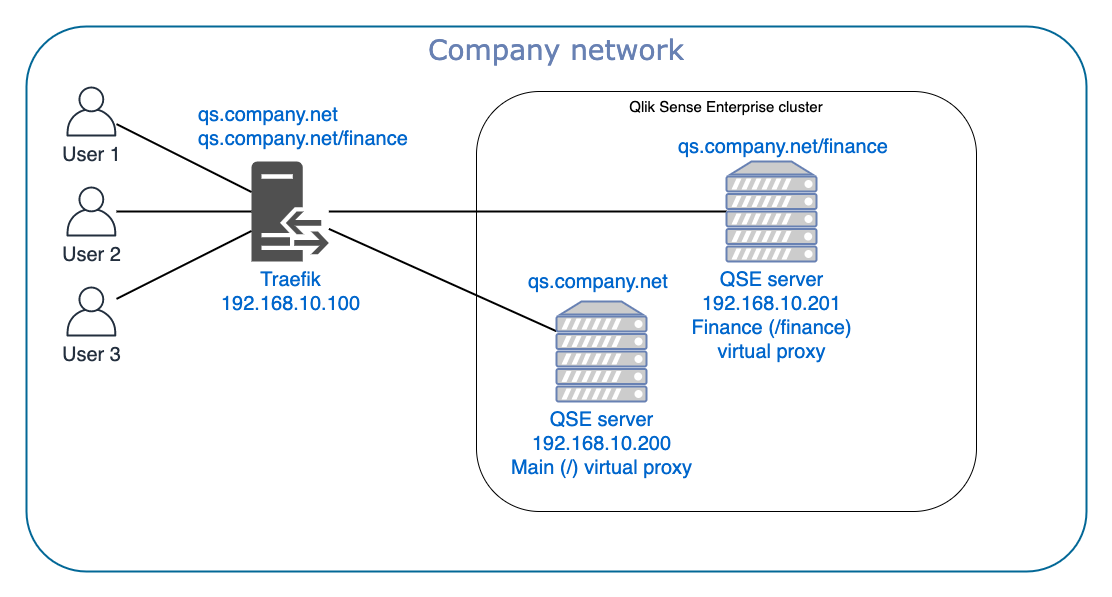
In this scenario Traefik is configured to look not only at the first part of the URL (qs.company.net), but also at the second part (the path). Traefik forwards requests for https://qs.company.net/finance to https://192.168.10.201/finance and everything else to https://192.168.10.200.
Qlik Sense and Traefik – Development, Test and Production environments
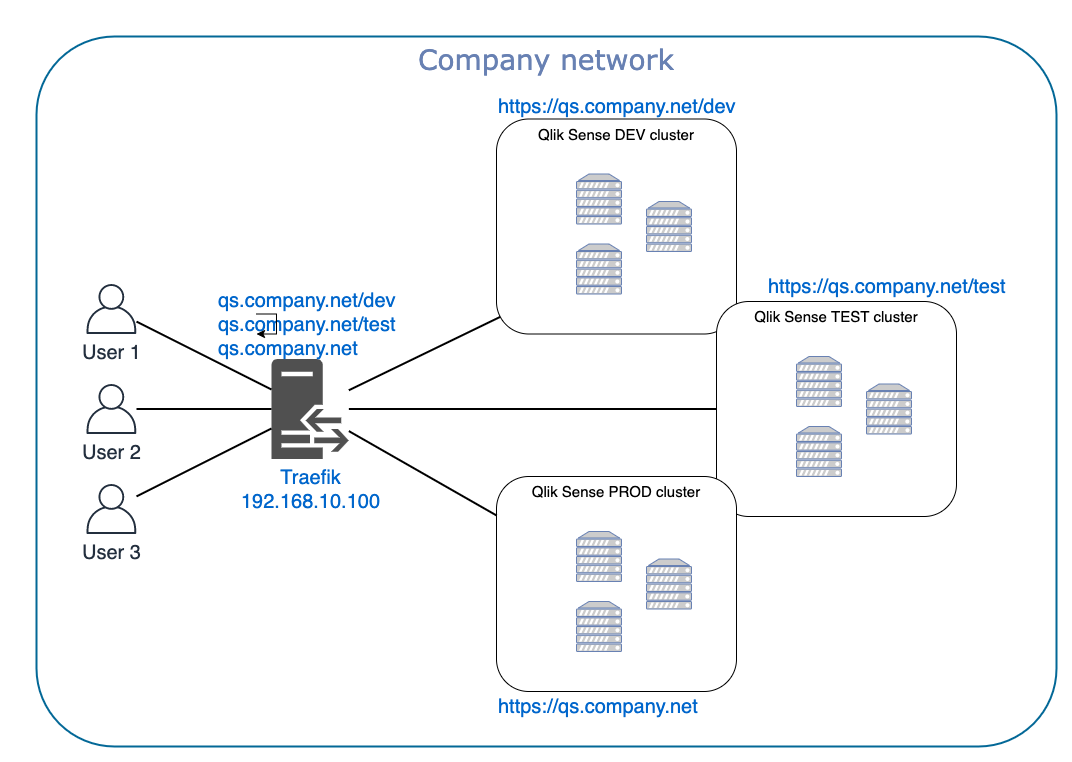
Larger companies often have separate DEV, TEST and PROD environments for Qlik Sense. If you want different host names for the different environments (e.g. qs-dev.company.net, qs-test.company.net, qs.company.net) that can be achieved with DNS aliases.
If you on the other hand want to use URLs as qs.company.net/dev, qs.company.net/test and qs.company.net you need a reverse proxy:
Qlik Sense and Traefik – Accessing Qlik Web Connectors or other tools
So far the examples have assumed the users connect using https and that the Sense cluster(s) expose standard https on port 443.
But some tools don’t use port 80/443 (http/https).
As an example, the default setting for Qlik Web Connectors (QWC) is to expose its services on port 5555, resulting in URLS such as http://qwc.company.net:5555.
Not pretty, we’d of course much rather have something like http://qwc.company.net or maybe http://qs.company.net/qwc. But if QWC is running on a server where another process already uses port 80, you have a problem.
Once again, Traefik comes to the rescue. Traefik can be configured to recognise qwc.company.net (or qs.company.net/qwc) and forward traffic to those URLs to http://server-where-qwc-is-running:5555. The user will only see the “vanity URLs” though – no ugly 5555 port will be visible to end users.
The same concept can of course be applied to other tools too. Let’s say you want to run Butler (a DevOps toolkit for QSE, open source from Ptarmigan Labs) and it’s REST API on the same server as QWC. No problem, just have the various tools expose their services on different ports, then have Traefik send requests to the correct host/port based on the incoming requests host name and/or path. If Butler’s REST API is available on port 8888 things could look like this:
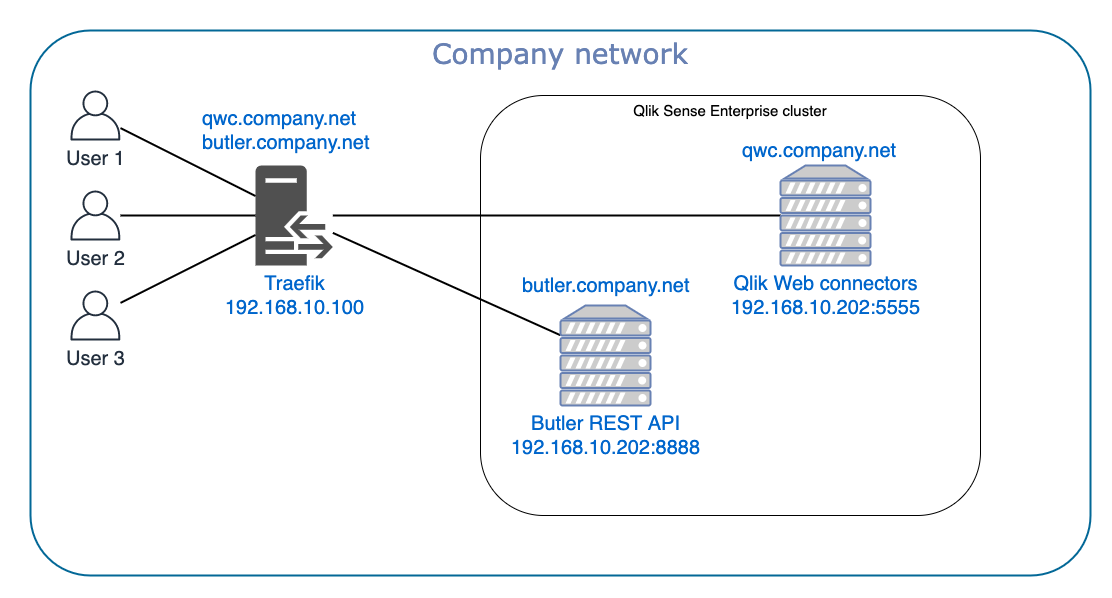
Requests to http://qwc.company.net and http://butler.company.net will thanks to Traefik end up on the correct host/port.
TLS termination
Security is important – period.
In the same spirit: https should always be used when dealing with corporate or in other ways sensitive data.
Applying this to Qlik Sense, it should always be protected by https.
Http access should be turned off completely.
Now, let’s say you have a Sense environment with separate DEV, TEST and PROD clusters, with a few Sense servers in each. In order to adhere to the always-use-https mantra, you need to install the appropriate TLS certificates on at least one server each in DEV/TEST/PROD. That of course works, but Traefik offers a better and more convenient solution: TLS termination.
This concept is really pretty simple: All traffic from the users’ web browsers to Traefik, for all services is encrypted using the TLS certificate(s) installed in Traefik. Traefik decrypts the incoming traffic and forwards unencrypted traffic to the back-end services (for example Qlik Sense, Qlik Web Connectors, Butler etc). Those services send their unencrypted responses back to Traefik, which encrypts the responses and send them to the users.
Firewall rules on the back-end servers add the final piece of the security puzzle: They make sure that the only destination back-end services can send information to is the Traefik server. In other words: All traffic from and to end users go through Traefik.
Ok, that’s cool, but why is this important?
Two reasons really:
- Certificates only need to be installed/managed in a single location. Makes it easier to replace them when they need to be renewed or replaced.
- Encrypting traffic takes resources on the back-end services. By offloading the encryption work to Traefik we get a few extra CPU cycles to use in QSE and other back-end services.
Benefits of using Trafik with Qlik Sense
We’ve already looked at some of the benefits of using a reverse proxy in front of Qlik Sense Enterprise. In addition to these Traefik also offers several more features that can be very useful :
- Don’t have a TLS certificate? Traefik has built-in support for Let’s Encrypt certificates. As long as you have a valid domain Traefik can automatically get TLS certificates for it. Extremely handy!
- Keeping track of both performance of the Sense environment, as well as Sense URLs that are broken or redirects. This might not be obvious at first, but as all requests and responses go through Traefik, it can measure how long requests/responses take, how many http errors/warnings/success calls are made etc. In other words: Traefik makes it easier to understand if parts of QSE are broken or poorly configured.
- Load balancing. Traefik can be used to load balance incoming requests for a service across several back-end servers. While QSE has its own load balancing between nodes in a Sense cluster, Traefik’s ditto can be used when migrating from one Sense cluster to another. Traefik can then be used to initially send 5% of users to the new cluster, then 10%, then 25% etc. Useful if you want to minimise downtime during systems migration exercises. This is sometimes referred to as migration by means of canary users.
- The circuit breaker feature makes sure user requests are not sent to unhealthy back-end services.
- HTTP headers can be modified as needed before requests are sent to back-end services.
- Rate limiting ensures services are not overloaded.
- …and much more.
Running Traefik on Windows Server
By now you are hopefully convinced it’s a good idea to put a reverse proxy in front of Qlik Sense Enterprise on Windows (QSEoW). But how is that done in practice?
If Traefik is your choice of you have a few options:
- Run Traefik as a Docker container in stand-alone Docker, on some server. Linux servers tend to be most common, but the most recent versions of Windows Server are also useful for running Docker workloads.
- Run Traefik in Kubernetes. Either in some cloud provider’s Kubernetes environment or your own – this is the use case where Traefik really shines, but it’s also the most complex to set up.
- Run Traefik as a native application on Linux, MacOS or Windows Server. Below we will look at the Windows Server option, with the idea being that Traefik could even run on one of the QSE servers themselves.
Installing Traefik on Windows Server
There is no installer, just a single .exe binary in a zip file available from Traefik’s Github release page. For Windows Server you want the traefik_v2.2.10_windows_amd64.zip file, which at the time of this writing is the latest version.
The following steps give an overview of the installation process, but details such as directory names etc may be different in your specific case.
- Download the zip to a directory of choice on your server. Depending on how your Windows Server is configured, you may also need to unblock the zip file (right-click the zip file from File Explorer -> select properties -> Unblock -> Ok.
- Unpack the zip to a directory of choice. In this text we’ll use
c:\tool\traefik. - Create directories for logs, certificates and dynamic configuration files:
c:\tool\traefik\dynamic_config,c:\tool\traefik\certandc:\tool\traefik\log.
Config 1: Static config file
Traefik uses two different types of config files: One static file and one or more dynamic ones.
The static config is only read when Traefik starts, while the dynamic ones are continuously monitored for changes. Settings changed in the dynamic config files are thus applied immediately without any downtime or restart of Traefik.
The config files can be either TOML or YAML formatted and called anything, let’s go with c:\tool\traefik\traefik.yaml for the static one:
---
global:
  checkNewVersion: true
  sendAnonymousUsage: false

log:
  level: INFO
  filepath: C:\tool\traefik\log\traefik.log

api:
  dashboard: true
  insecure: false
  debug: true

entryPoints:
  web:
    address: ":80"

  websecure:
    address: ":443"

providers:
  file:
    watch: true
    directory: C:\tool\traefik\config_dynamic
A couple of notes to the configuration above:
api.dashboard=truemeans that Traefik will expose its own dashboard ond- Traefik defines two basic entrypoints that it will listen to: http (port 80) and https (port 443).
- Dynamic config files are stored in
c:\tool\traefik\config_dynamic providers.file.watch=truemeans that Traefik will watch the dynamic config files for changes, and apply those changes on the fly without any need for restarts.
Config 2: Traefik dashboard
We can provide access to Traefik’s own status dashboard by means of a dynamic config file. This file also redirects from http to https, as well as puts a user/pwd protection on the dashboard (username:pwd is admin:admin).
The file is called c:\tool\traefik\config_dynamic\traefik_dynamic.yaml:
---
http:
  routers:
    traefik-http:
      rule: Host(`traefik.ptarmiganlabs.net`)
      entrypoints: web
      service: api@internal
      middlewares:
        - traefik-https-redirect
        - traefikAuth
    traefik-https:
      rule: Host(`traefik.ptarmiganlabs.net`)
      entrypoints: websecure
      tls: {}
      service: api@internal
      middlewares:
        - traefikAuth
  middlewares:
    traefik-https-redirect:
      redirectScheme:
        scheme: https
        permanent: true
    traefikAuth:
      basicAuth:
        users:
          - "admin:$apr1$c5IwaNCW$VpEXax7LtUneLsElXFWCI."
Some comments:
- We use a redirectScheme middleware to ensure all calls to http://traefik.ptarmiganlabs.net are forwarded to https://traefik.ptarmiganlabs.net
- The backend service which traffic is forwarded to is api@internal, which is Traefik’s internal dashboard service.
- A basicAuth middleware is used to password protect the dashboard.
Config 3: Securing Qlik Sense
Ok, let’s see if we can solve the main goal of this article: https access to Qlik Sense.
It takes a few lines in the c:\tool\traefik\config_dynamic\qliksense-dynamic.yaml file, but with the help of the Traefik docs you should be able to decode what’s going on:
---
http:
  routers:
    qliksense-http:
      rule: Host(`qliksense.ptarmiganlabs.net`)
      entrypoints: web
      middlewares:
        - qliksense-https-redirect
      service: qliksenseService
    qliksense-https:
      rule: Host(`qliksense.ptarmiganlabs.net`)
      entrypoints: websecure
      service: qliksenseService
      middlewares:
        - sslHeader
      tls:
        passthrough: false
  middlewares:
    qliksense-https-redirect:
      redirectScheme:
        scheme: https
        permanent: true
    sslHeader:
      headers:
        customRequestHeaders:
          X-Forwarded-Proto: https
  services:
    qliksenseService:
      loadBalancer:
        servers:
          - url: "http://192.168.100.110:8088"
Some comments:
- We want to access Sense at https://qliksense.ptarmiganlabs.net. The DNS should be configured so that qliksense.ptarmiganlabs.net points to the Traefik server.
- http to https redirect is done, with TLS termination taking place in Traefik.
- Sense is accessed on port 8088 on IP 192.168.100.110. This is a regular http port.
- The X-Forwarded-Proto setting is needed to make websockets work over https.
Config 4: Setting up TLS termination
We want all https traffic to terminate at Traffic, only unencrypted traffic should be sent to the back-end services.
Whether to forward https to back-end services or not is controlled by the tls section in the individual dynamic config files (or on a global level in the static config file), but we also need to tell Traefik which TLS certificates to use.
This is done in a dynamic config file called c:\tool\traefik\config_dynamic\tls.yaml:
tls:
  stores:
    default:
      defaultCertificate:
        certFile: cert/ptarmiganlabs_net.cer
        keyFile: cert/ptarmiganlabs_net.key
The certificate files (.cer and its associated .key file) are placed in the c:\tool\traefik\cert directory
Start Traefik and run it as a Windows service
Starting Traefik is done from a Windows command prompt or PowerShell.
In the directory where traefik.exe lives, just run
traefik.exe --configFile=traefik.yaml
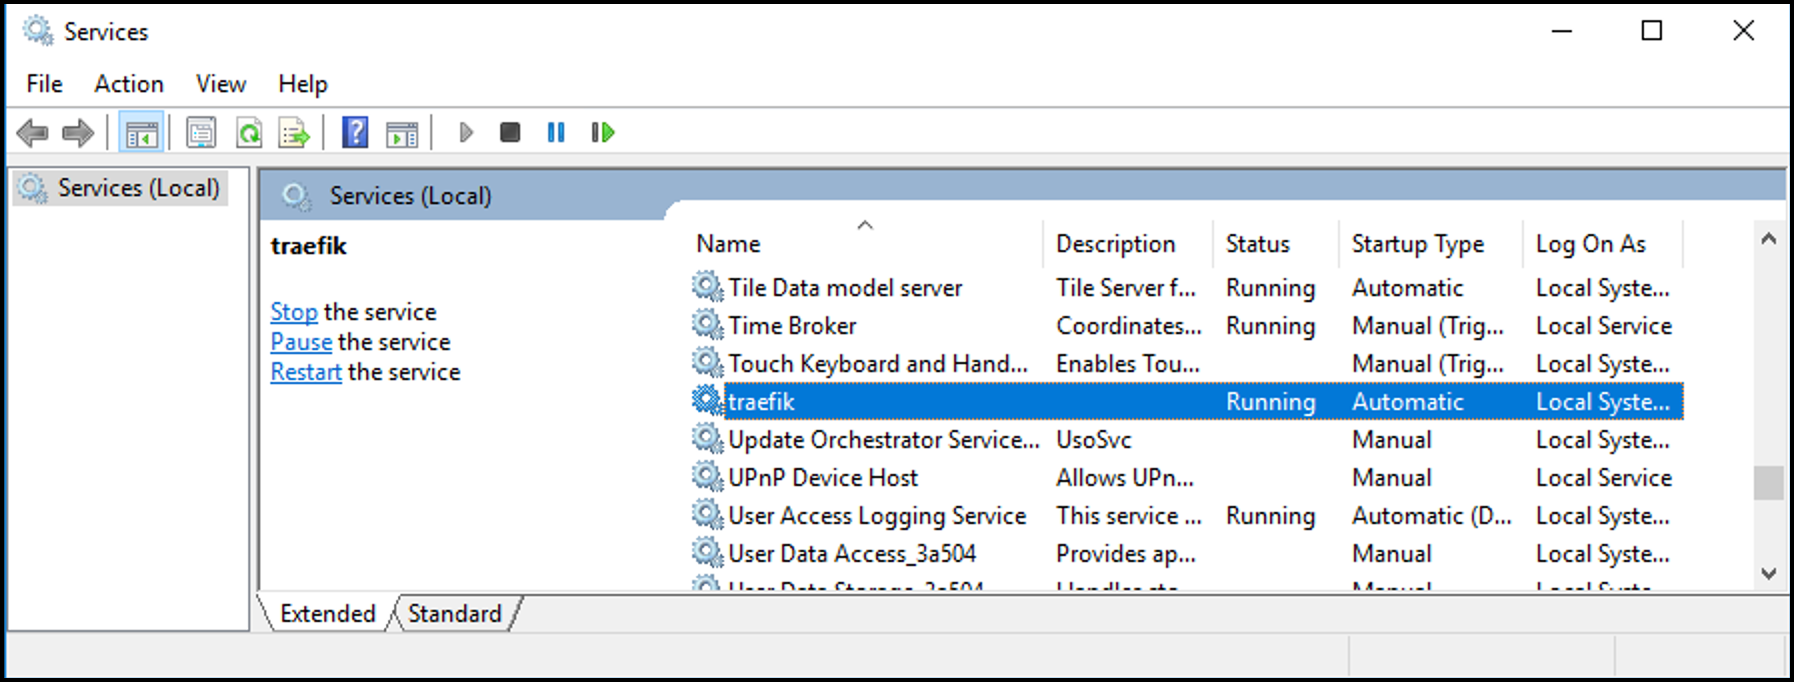
If you want to run Traefik as a Windows service, the excellent nssm tool solves this very nicely. You then get Traefik as a regular Windows service:
Operations and monitoring
Monitoring: The Traefik dashboard
Hang in there, almost done. The Traefik dashboard is worth a quick comment too.
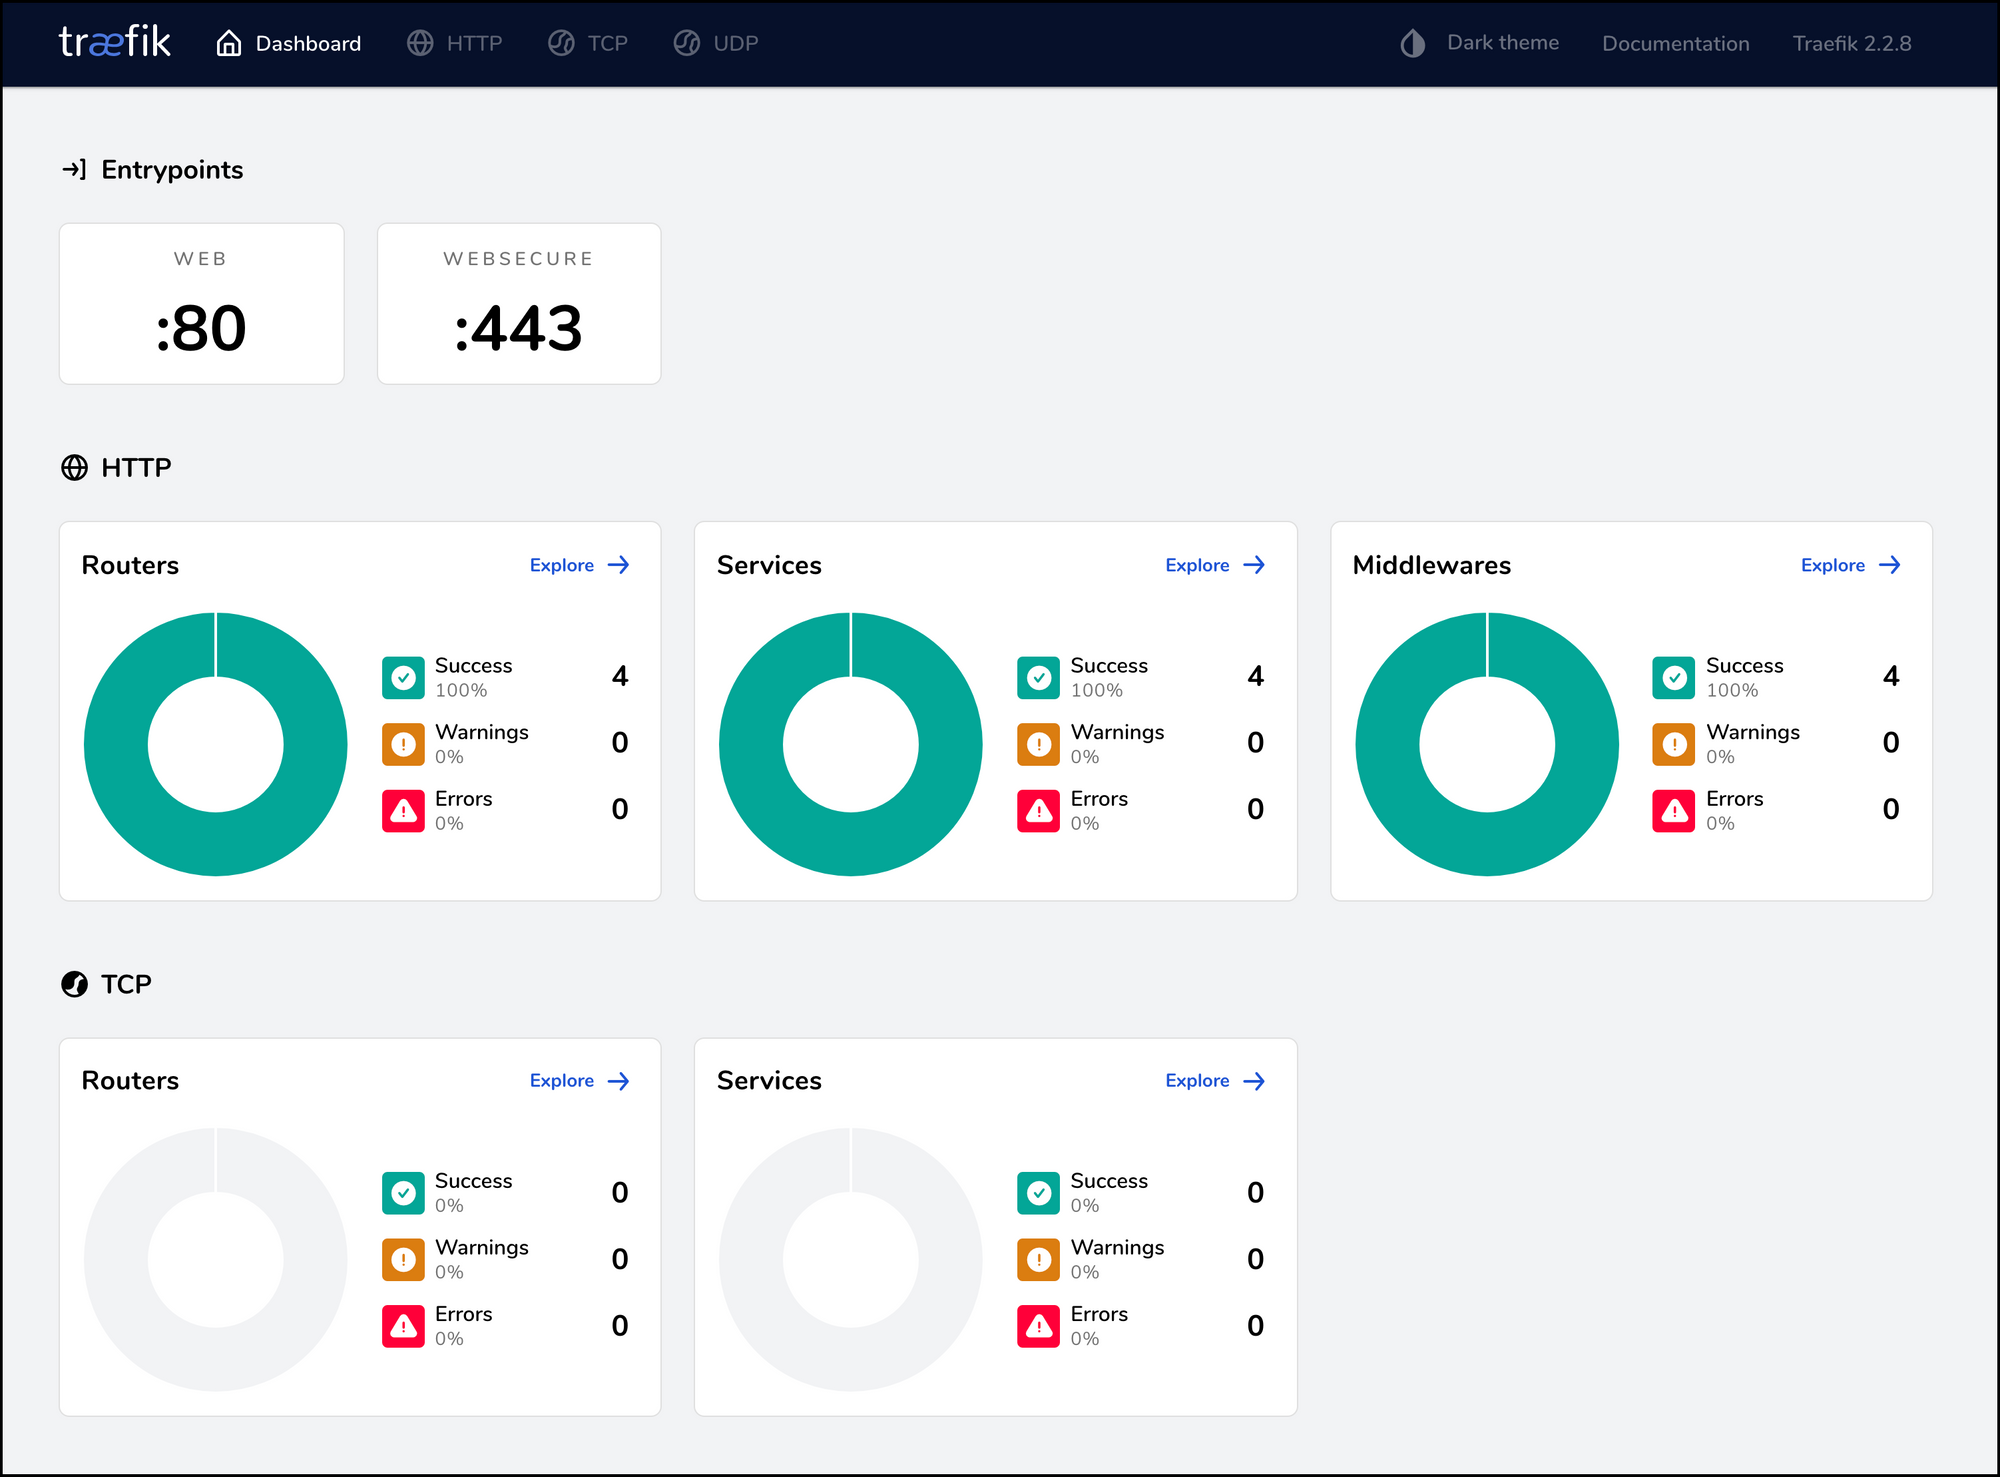
We all like pretty dashboards, and Traefik’s is pretty ok. But more than that, it also provides very useful information about how the various back-end services perform and function. As all traffic passes through Traefik, it can keep track of how many http success/warnings/errors there are from for example Qlik Sense.
For example, if a Sense mashup is somehow broken and returns http errors, these will show up in Traefik’s dashboard. In the sample dashboard below all is good though:
Next steps
Good work if you made it this far, this turned out to be a pretty long blog post. Still, we’ve barely scratched the surface of what Trafik is capable of, both on its own and together with Qlik Sense.
Stay tuned for coming blog posts covering topics such as
- Advanced operations and monitoring concepts. How to get detailed, network level information about how Qlik Sense is used.
- How Traefik can be configured to route traffic for Sense add-on services, including for example Qlik Web Connectors, NPrinting, Butler SOS and other tools in the Butler family of DevOps tools for Qlik Sense).
- How to do canary deployments (where a subset of users get a new feature) in Qlik Sense.