
The lazy Qlik developer #4: How many users right now?
PowerShell script that will show how many - and what - users are connected to a client-managed Qlik Sense Enterprise server.


A small PowerShell script that will list how many proxy sessions there are to a certain Qlik Sense proxy, as well as the usernames of the connected users.
Uses certificates for authentication and should work in all reasonably recent versions of client-managed Qlik Sense Enterprise.
When faced with a new task I first turn to the tools I already know.
When dealing with Qlik Sense (client-managed or Cloud) Qlik's own Qlik CLI tool is great, at least when you need to do basic work with Qlik Cloud or the repository service (=QRS) of client-managed Qlik Sense. Combined with PowerShell and JWT authentication it is possible to create quite capable little scripts.
If the use case is too complex for Qlik CLI + PowerShell I might turn to the open source tool Ctrl-Q - possibly even adding a new command to that tool (at least if the task is repetetive with the potential of saving lots of time).
There are however cases where you just need a bit of information from some non-QRS API, for example when you wonder how many users are currently connected to your Sense server.
Maybe you need to do an urgent restart and wonder how many users will be affected.
Sure, you could set up Butler SOS and get best-in-class, continuous monitoring.
But sometimes you just want a quick little command line utility rather than a full blown monitoring solution.
In exactly that scenario the script below can be useful.
Just ask yourself: Who should be the first to know that your Sense environment is having troubles: You or your end users?
Butler SOS will let you know within seconds that something is not right in your Sense server(s).
How many Sense users and who are they?
The script below...
- tells you how many and also what users are connected to a Sense proxy - no more, no less.
- uses a Qlik client certificate to authenticate with Sense. This concept can be used for most client-managed Sense APIs, not only the proxy API.
- uses PowerShell on Windows Server or desktop. PowerShell on macOS and Linux may work too - not tested though.
The certificate must be available for the user who executes the PowerShell script. You can export certificates from the QMC as per instructions here or here.
Remember to ...
- set a machine name that matches the host name you will use to access Sense later on. This will usually be the server's normal host name.
- use "Windows format" for the exported certificates. This will create .pfx certificate files.
- include the secret key.
- NOT password protect the certificate files.
In many cases JWTs are a better solution (not possible here though, as Qlik CLI doesn't allow access to the proxy API) as they allow you to connect using a specific user (which can be given appropriate access in Sense). The qs-jwt tool provides a good intro to using JWTs with Qlik Sense.
# qs_get_proxy_sessions.ps1
#
# PowerShell script used to get the number of proxy sessions for the default virtual proxy in Qlik Sense (i.e. /).
#
# Adapt the following fields before running on the Qlik Sense server itself while logged in as the QS service account user:
# - Host name of Sense server, in the $url variable. An easy way to get this is from the QMC: Nodes > Host name
#
# The script looks for the QlikClient certificate in the current user's Windows repository. Windows Server and desktop are both ok.

$hdrs = @{}
$hdrs.Add("X-Qlik-xrfkey","12345678qwertyui")
$hdrs.Add("X-Qlik-User","UserDirectory=Internal;UserId=sa_api")
$hdrs.Add("User-Agent","Windows")
$hdrs.Add("Content-Type","application/json")
$cert = Get-ChildItem -Path "Cert:\CurrentUser\My" | Where {$_.Subject -like '*QlikClient*'}
$url = "https://my.sense.server:4243/qps/session?xrfkey=12345678qwertyui"

# If you are getting an error "Could not establish trust relationship for
# the SSL/TLS secure channel" you can try uncommenting the next few lines.
# This will disable certificate checks when calling the Qlik Sense proxy API.
# Not ideal for production use but should be ok for a small script like this.
#
# If you are using PowerShell >= 6.0 .0 you can instead add a parameter
# -SkipCertificateCheck to the Invoke-RestMethod call to disregard any
# certificate errors when connecting to the Sense server. You can then use
# any host name or IP that resolves to the Sense server, i.e. no need for
# the host name in the $url variable to match the host name in the
# QlikClient certificate.

<#
add-type @"
    using System.Net;
    using System.Security.Cryptography.X509Certificates;
    public class TrustAllCertsPolicy : ICertificatePolicy {
        public bool CheckValidationResult(
            ServicePoint srvPoint, X509Certificate certificate,
            WebRequest request, int certificateProblem) {
            return true;
        }
    }
"@
[System.Net.ServicePointManager]::CertificatePolicy = New-Object TrustAllCertsPolicy
#>

$sessions = Invoke-RestMethod -Uri $url -Method Get -Headers $hdrs -Certificate $cert

Write-Output "Number of proxy sessions for default virtual proxy / = $($sessions.length)"
Write-Output $sessions
Setting up the QlikClient certificate
After exporting certificates (in Windows format including the secret key!) from the QMC we have a set of files like this:
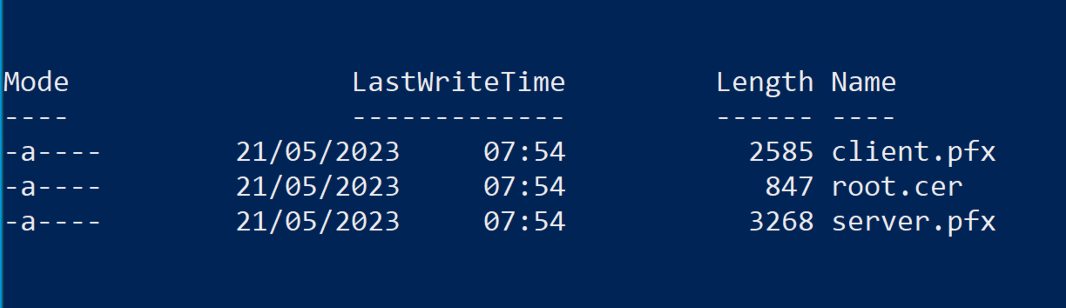
The client.pfx file contains the QlikClient certificate and private key that we are interested in.
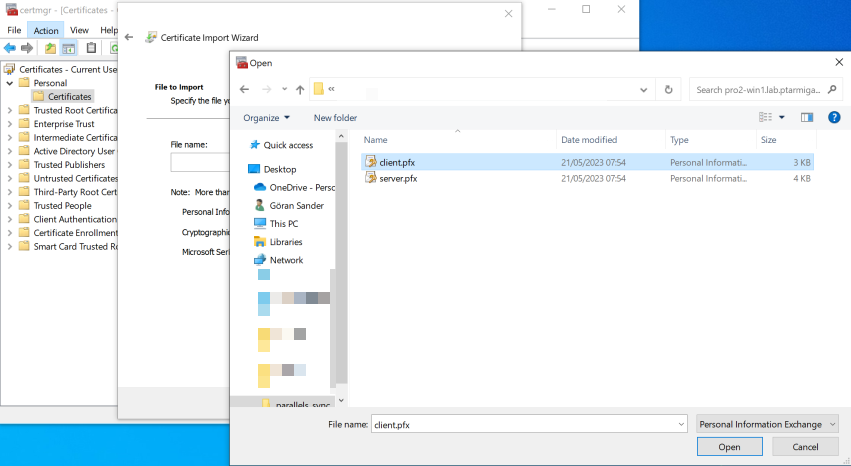
Import it into the current user's certificate store by running (on Windows).
- Run "Manage user certificates" from the start menu
- Go to "Certificates - current user > Personal > Certificates" in the tree structure on the left. Make sure there isn't already a QlikClient certificate there.
- From the menu, start "Action > All Tasks > Import... > Next".
- Select the pfx file exported from the QMC, click "Next".
- Click "Next > Next > Finish". A dialog "The import was successful" is shown.
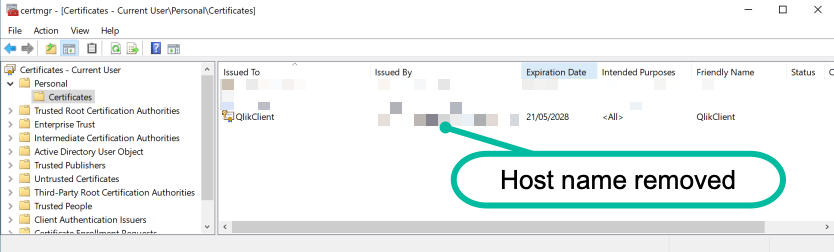
Should look like this:
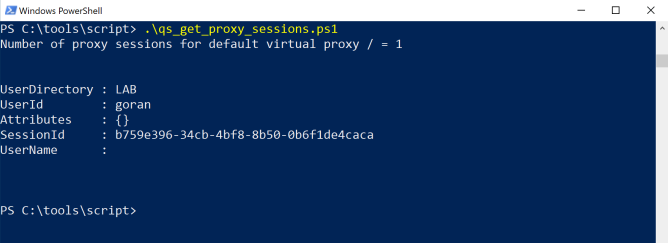
And the results are...
Here the script has been executed on Windows 10, showing that we have a single proxy session on the default virtual proxy in the Sense server:
Multiple virtual proxies? Yes we can!
If you have more than one virtual proxy you can get metrics for them too.
Add the virtual proxy's name in the url variable, after the "/qps" part.
For a virtual proxy called "vproxy1" it would look like this:
$url = "https://my.sense.server:4243/qps/vproxy1/session?xrfkey=12345678qwertyui"
Troubleshooting
Some Windows installations seems to be locked down and won't accept authentication using the self-signed certificate created by Qlik Sense. Which is a bit strange but nonetheless seems to be the case. Or somthing else is causing this problem.
Either way, that would give an error "Could not establish trust relationship for the SSL/TLS secure channel" when running the script, even though the client certificate from Sense has been imported into the current user's certificate store.
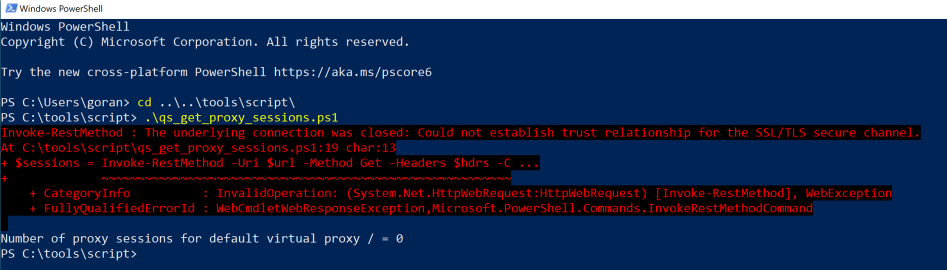
If this happens you can try uncommenting the chunk of code in the middle of the script. This will disable root certificate checks and let the script connect to Sense even though the certificate has an unknown root certificate (=Qlik Sense's self-signed certificate authority).